Linux/Windows XP/MacOS - IPP
Attention: Please respect the queue and the driver for your operating system, see here: MatrixIf you do not put the correct queue and use the correct driver you will not able to print and you can see your account disable.
Installation process for:
Windows
1st Execute Printer
and Faxes
2nd Click Add Printer
3rd Click Next
4th Choose Network Printer
5th Click Next
6th Select URL and write https://printers.di.uminho.pt:443/printers/<queue> (example:
https://printers.di.uminho.pt:443/printers/ricoh2060)
7th Click Next
8th On this window please insert the "user" and
"password" from LDAP service
9th Choose/Install the driver
10th Click on OK
Now, your the printer should be ready. Please configure the printer options.
Linux
Please install cups and be sure that it is working. (chkconfig cups on
; service cups restart)
1st Open a "browser" with URL:
http://localhost:631/admin (It is asked the "login" normally is root and the
password)
2nd Click on "Manage Printers"
3rd Click on "Add Printer"
4th Give a name to printer (example ricoh2060)
5th Choose "Internet Printing Protocol (ipp)"
6th Choose URL: http://<user>:<password>@printers.di.uminho.pt:443/printers/<queue>
(example:
http://apa:ok11234@printers.di.uminho.pt:443/printers/ricoh2060)
7th Choose the "driver"
Your printer now is ready. It is still necessary to configure printer options.
MacOS
MacOSX Tiger (10.4)
1st Execute "Printer Setup Utility"
2nd Add a printer ("Add")
3rd On the windows ("Printer Browser"), with
"alt" key pressed select "More Printers"
4th On the windows that appears select "Advanced" on the first pull-down menu.
5th On the pull-down menu "Device" choose "Internet Printing Protocol using IPP"
6th On "Device Name" choose a name (example printer)
7th On "Device URI" write this URL: http://<user>:<password>@printers.di.uminho.pt:443/printers/<queue>
(Example: http://apa:ok11234@printers.di.uminho.pt:443/printers/ricoh2060)
8th On the pull-down menu "Printer Model:" choose the printer
9th Select "Add" and the printer is configured.
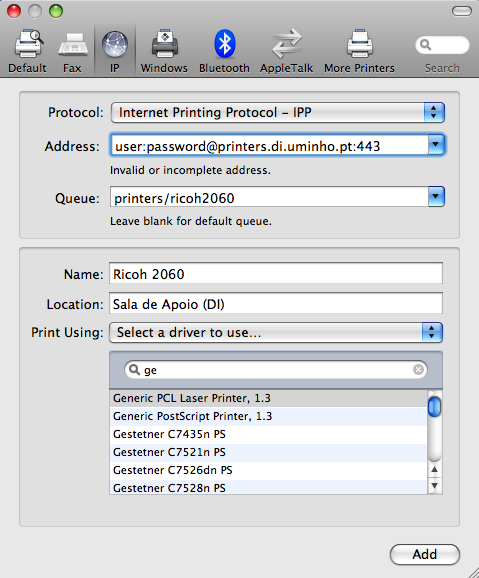
MacOSX Leopard (10.5)
See this example.
MacOSX Snow Leopard (10.6)
See the Linux example.
MacOSX Lion (10.7)
Use the same example but do not put your credentials. In the first print job they will be requested.
MacOSX Mountain Lion (10.8) / MacOSX Mavericks (10.9) / MacOSX Yosemite (10.10) / MacOS X El Capitan (10.11) / macOS Sierra (10.12) / macOS High Sierra (10.13)
Please use the example from MacOSX Lion (10.7) or you can use rather the example from Linux.